Enable New Battery Percentage on iOS 16
Monday, 12 September 2022
One of the many new features in iOS 16 is a battery percentage indicator layered on top of the battery symbol. Here are the quick steps to enable this feature.
Steps
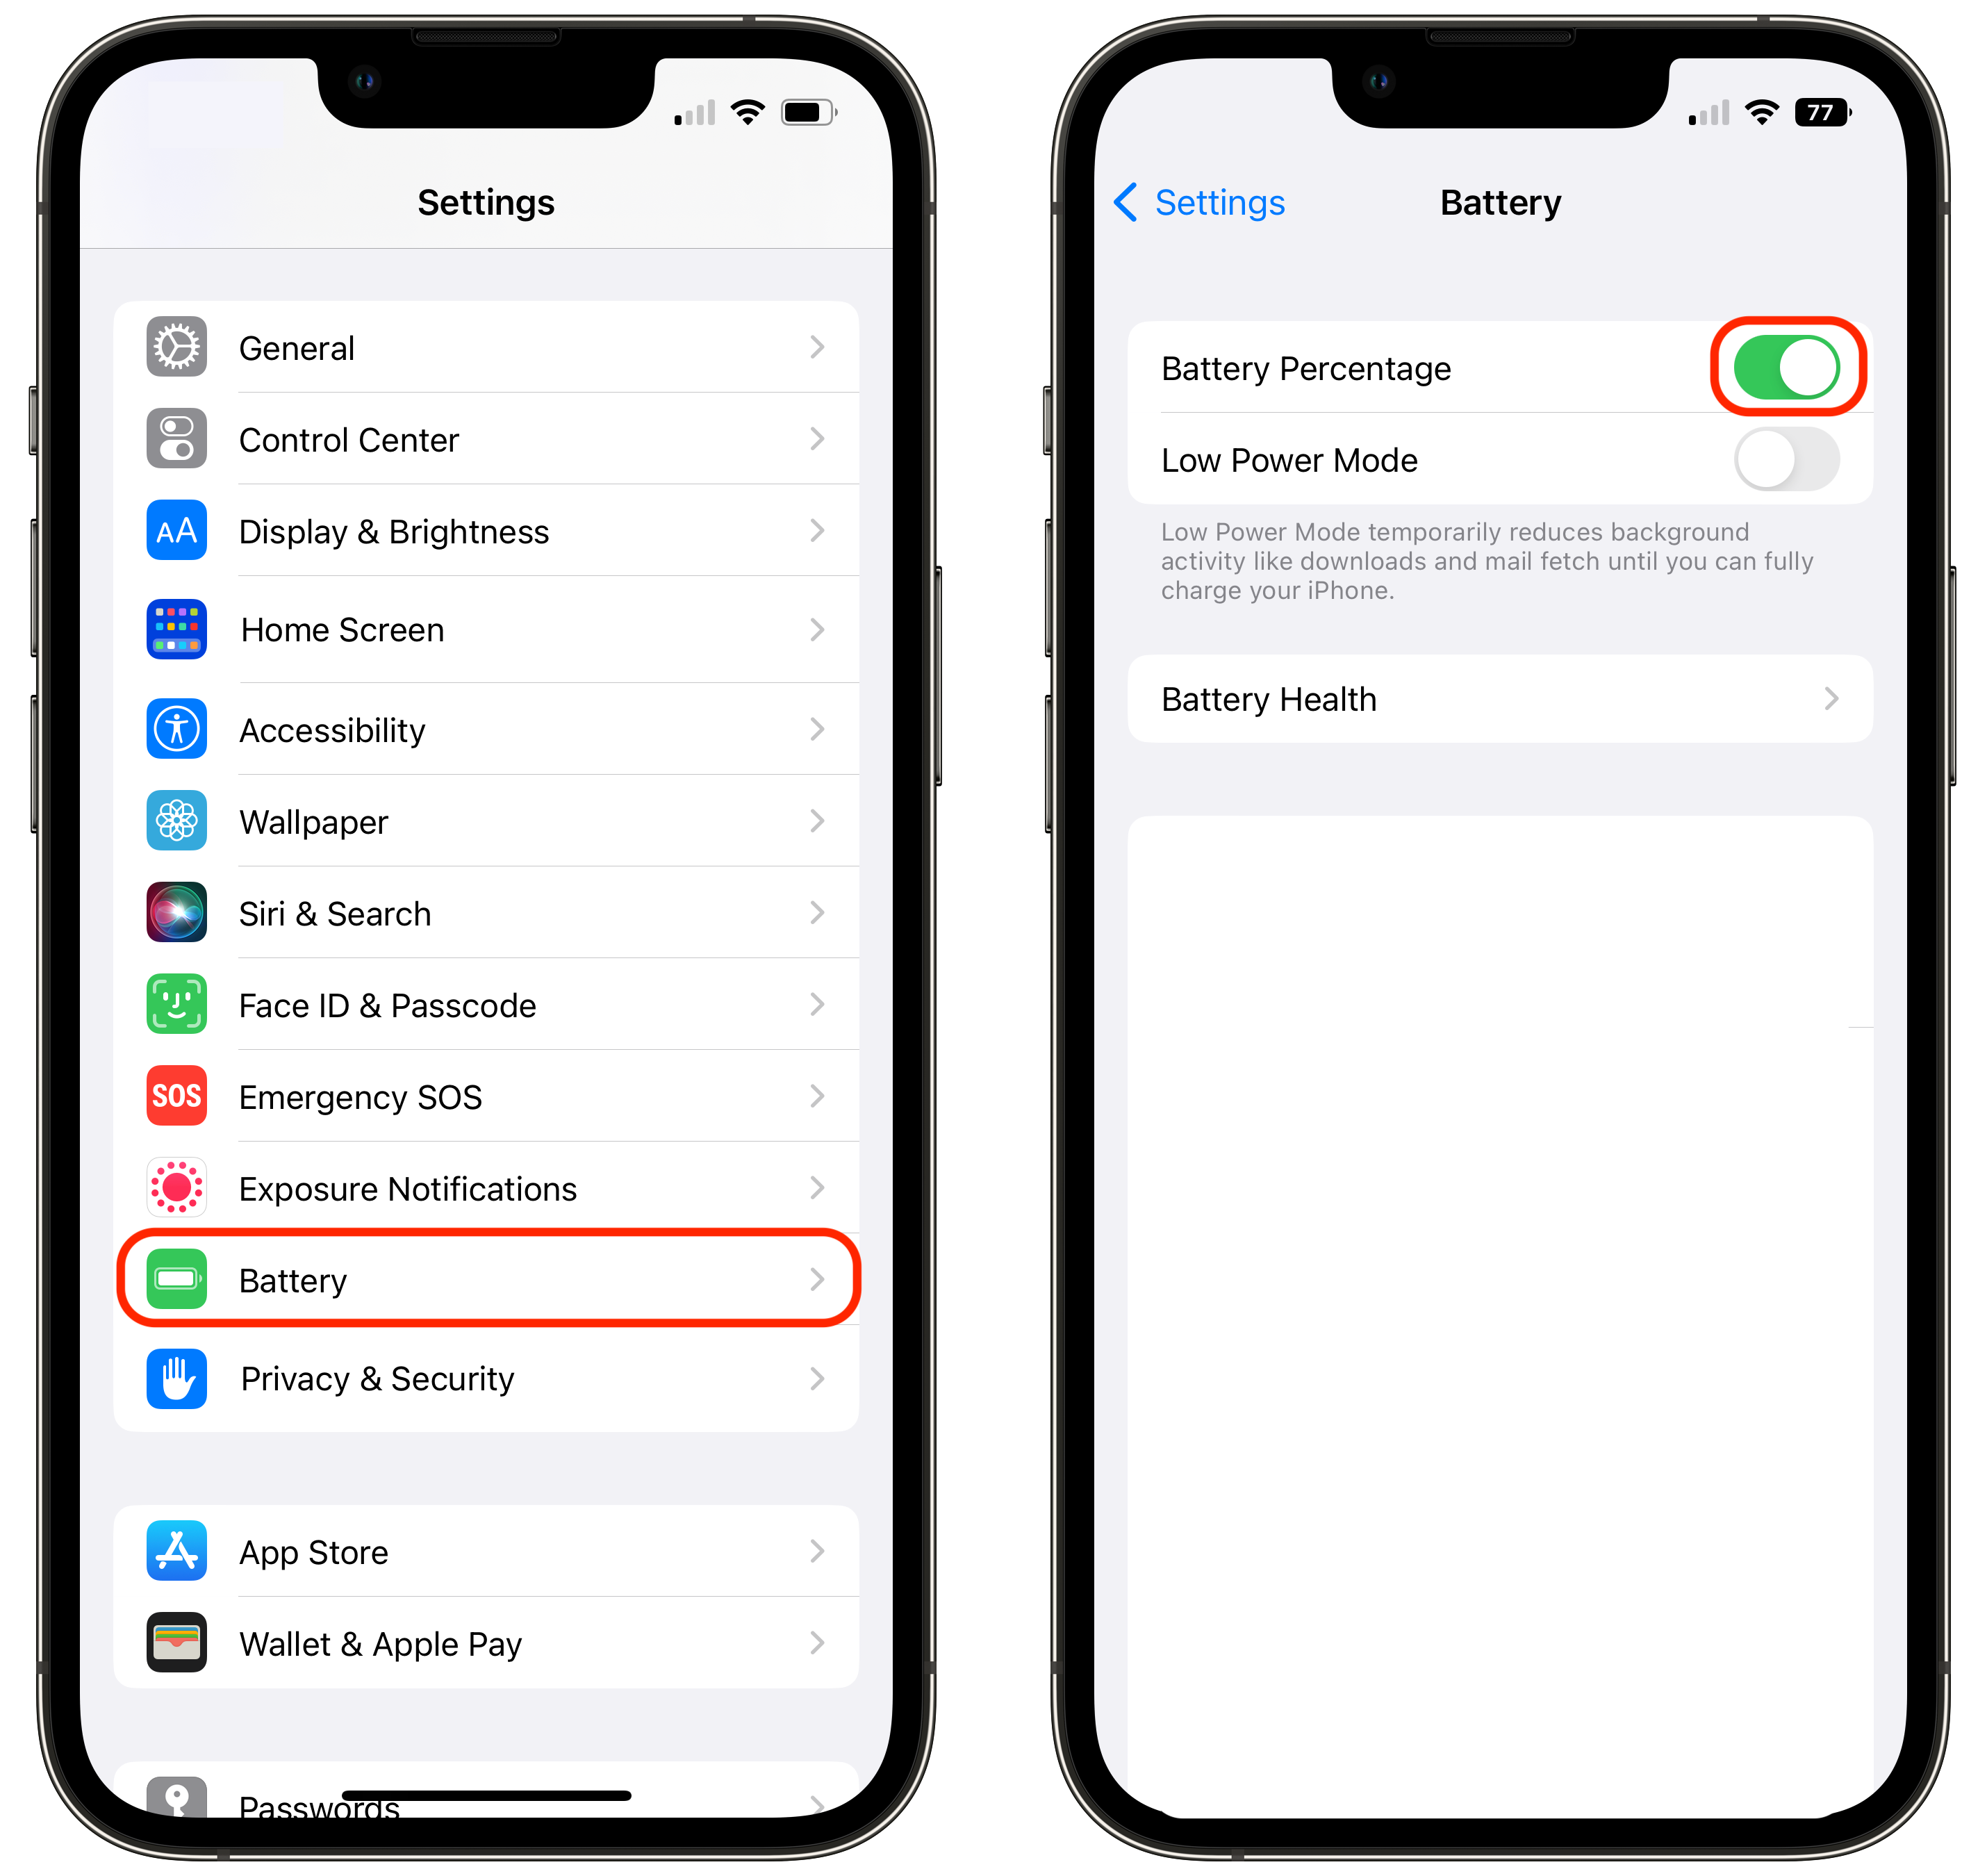
- Open the Settings app
- Scroll to the section beginning with General and select Battery
- Tap to enable the Battery Percentage toggle
Done!
Enable Keyboard Haptics on iOS 16
Monday, 12 September 2022
One of the many new features in iOS 16 is a toggle to enable haptic feedback (fake clicks) for the system keyboard. I am very excited about this change, so I am making a quick post to share how to enable this feature.
Steps
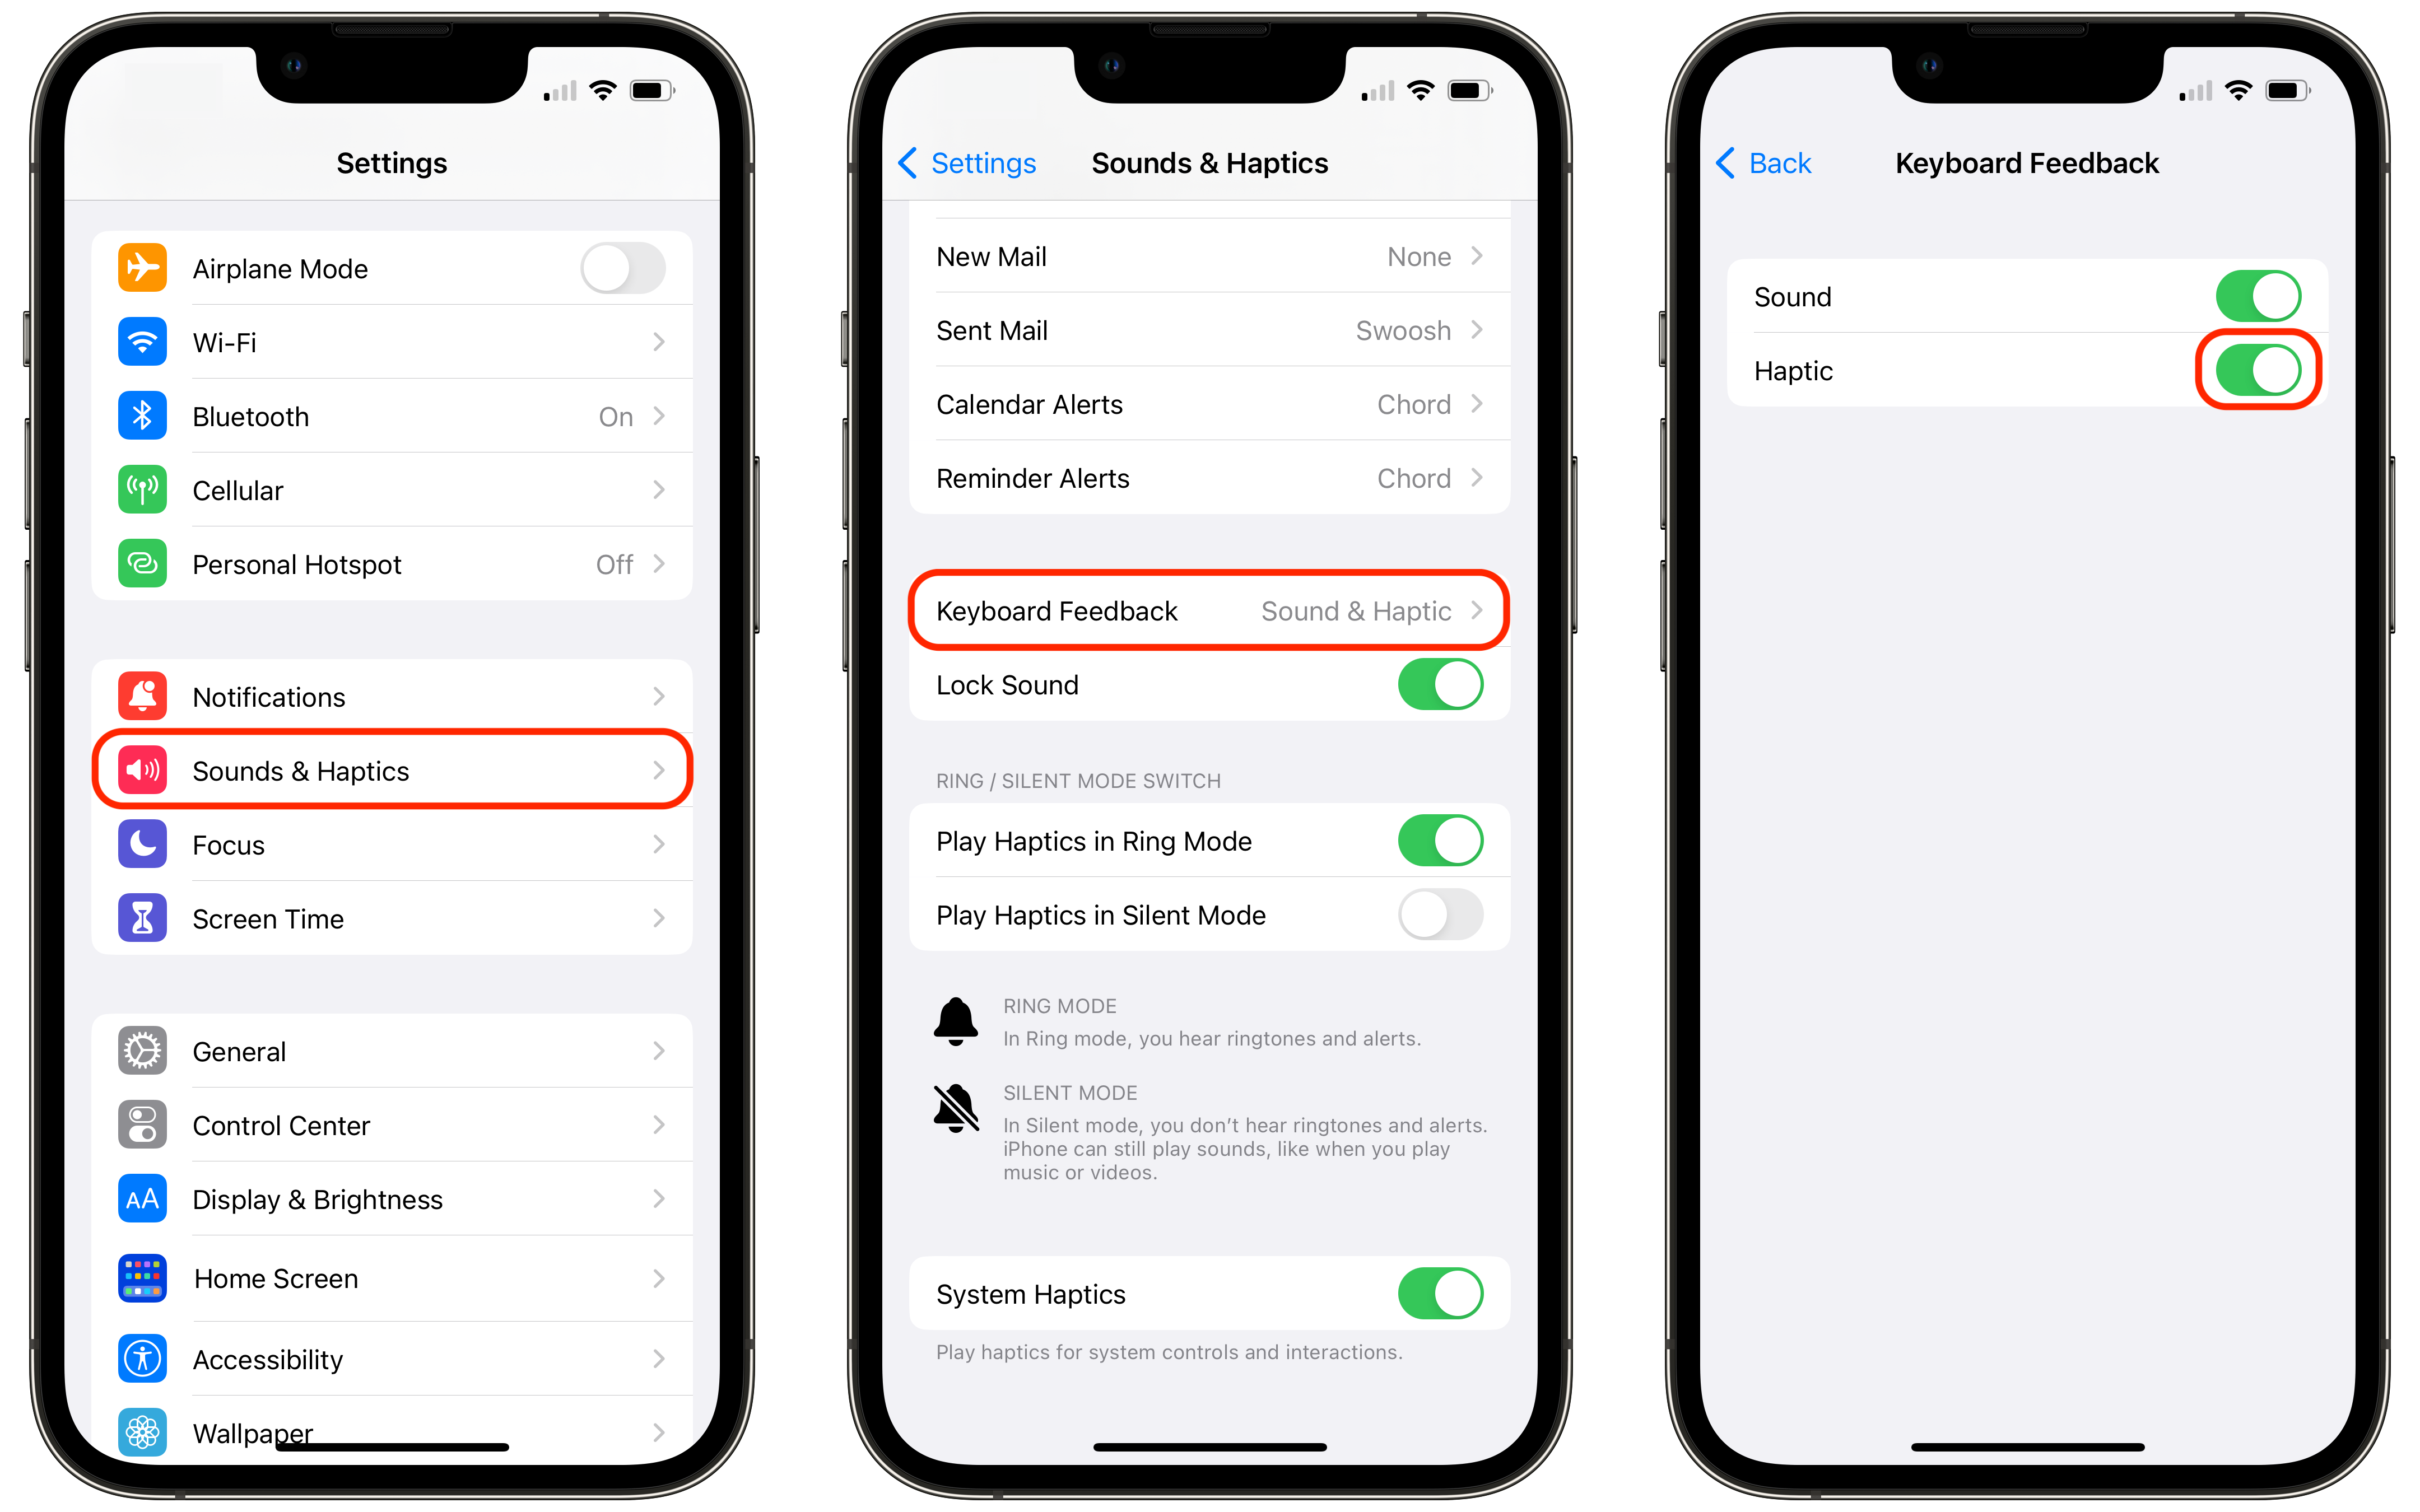
- Open the Settings app
- Scroll to the section beginning with Notifications and select Sounds & Haptics
- Scroll to the fourth section and select Keyboard Feedback
- Tap to enable the Haptic toggle
Done! Enjoy your keyboard clicks!
Apple Silicon Transition in 2022
Monday, 03 January 2022

Each year, I like to sit back and think about what the coming year may look like for technology. This year, I decided to write about some of my predictions. These are my thoughts for the remainder of the Apple Silicon Transition, in 2022.
Apple Silicon Transition
Back at WWDC 2020, Apple announced that it would begin a transition to Apple Silicon that would last for roughly two years. If we take that statement at face value, then by June of this year we should have a full lineup of desktops and laptops, all using Apple Silicon.
Ever since the announcement, there has been endless speculation about how each product would be transitioned to Apple Silicon. Fast-forward to now, we are really starting to get a feel for what Apple is capable of when they have greater vertical integration in the Mac lineup. As of January 2022, we have seen updates for the MacBook Air, MacBook Pro (twice), Mac mini, and the 24-inch iMac. The only remaining devices in the current lineup are the 27-inch iMac and the Mac Pro.
Remaining Transition
As I see it, the next product likely to be updated is the 27-inch iMac. I believe Apple will introduce a new iMac, of the same size, that will match the design of the 24-inch iMac from 2021. While matching the style, there will one big difference: the lack of colorful options. With the lack of colors, the 27-inch iMac will be rebranded the iMac Pro, with its smaller counterpart dropping the sizing adjective to be called iMac. Like the iPhone's of recent, Apple will continue leaving the colorful options to the non-Pro products and provide a limited set of muted-tones to the Pro products.
Finally, the last device to be updated — the big-boy of Mac computers — the Mac Pro. For me, this is going to be the most exciting device to be transitioned. While I am not in the market for the Mac Pro — this device has always aimed to exemplify the greatest of the great of computing. With this transition, we could see the next great leap in computing power and efficiency. This update will present a smaller case and (hopefully) retain all of the expansion slots that are in the current Mac Pro. Removing the expandability of this machine would be a huge step backwards for the company that just made the (famously) modular 2019 Mac Pro.
To me, this transition has been invigorating, to say the least. Once again, I am excited about the Mac. Every release has me waiting with bated breath to see what has been improved. Even with my (now out-dated) 2020 MacBook Pro, I have benefitted from the improved power and efficiency of the Apple Silicon transition with exceptional build and compile times in my Python and Xcode projects. That said, things can always get better, and that is what really excites me about the future of Apple Silicon.
Seven Segment Display in Swift Using UIKit
Friday, 31 December 2021
My style of software development is a bit abnormal — or maybe it is completely normal. During the development cycle of an app, I will be working on a feature and out of nowhere — like a gift from the heavens — a new app idea. This new idea may or may not have any relation to what I was working on — but an idea it is.
The most recent iteration of this was when I came up with an idea for a game-score display that looks like a traditional scoreboard. While I can't, yet, discuss the app idea behind this — what I can tell you is that the content of this post will be in an app that I will be releasing sometime in 2022.
Background
What do I mean by a traditional scoreboard? Well, to get started, let's abandon the scoreboard example and go with something simpler — a clock — specifically, my clock.
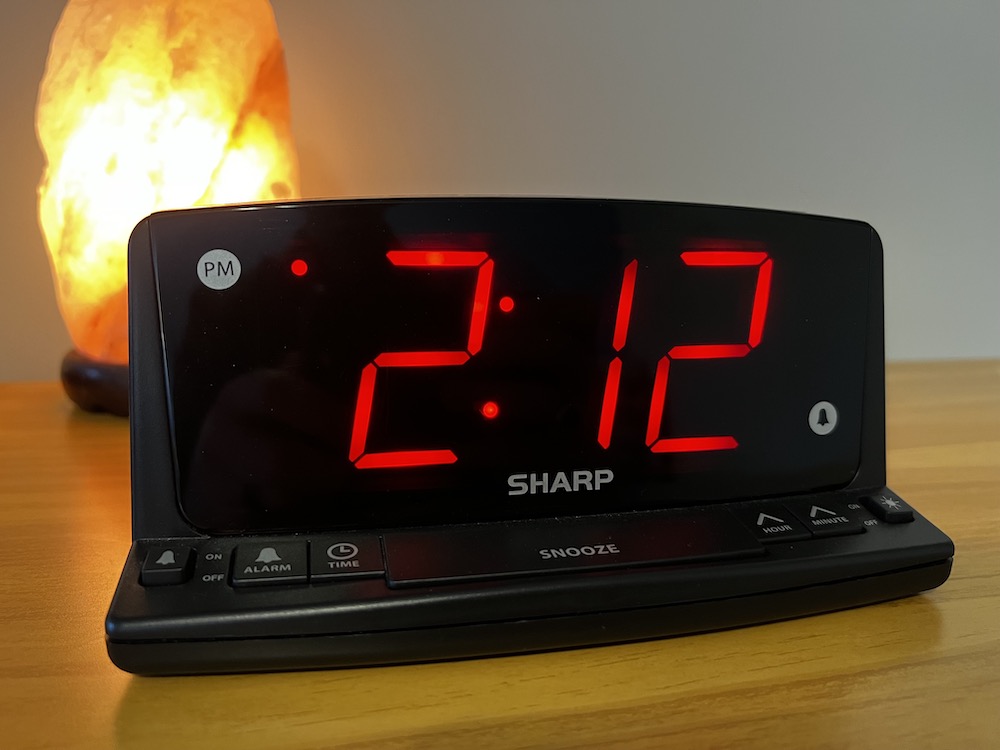 My alarm clock featuring a seven-segment display.
This clock is made up of three seven-segment displays.1 The three displays in this clock can be used to display every number, 0-9, by turning a selection of the segments on or off.2
Simple, right?
Implementation
Enough with the background, let's get started with the implementation.
UI
The UI for the seven-segment display is not very complicated — so let's get started.
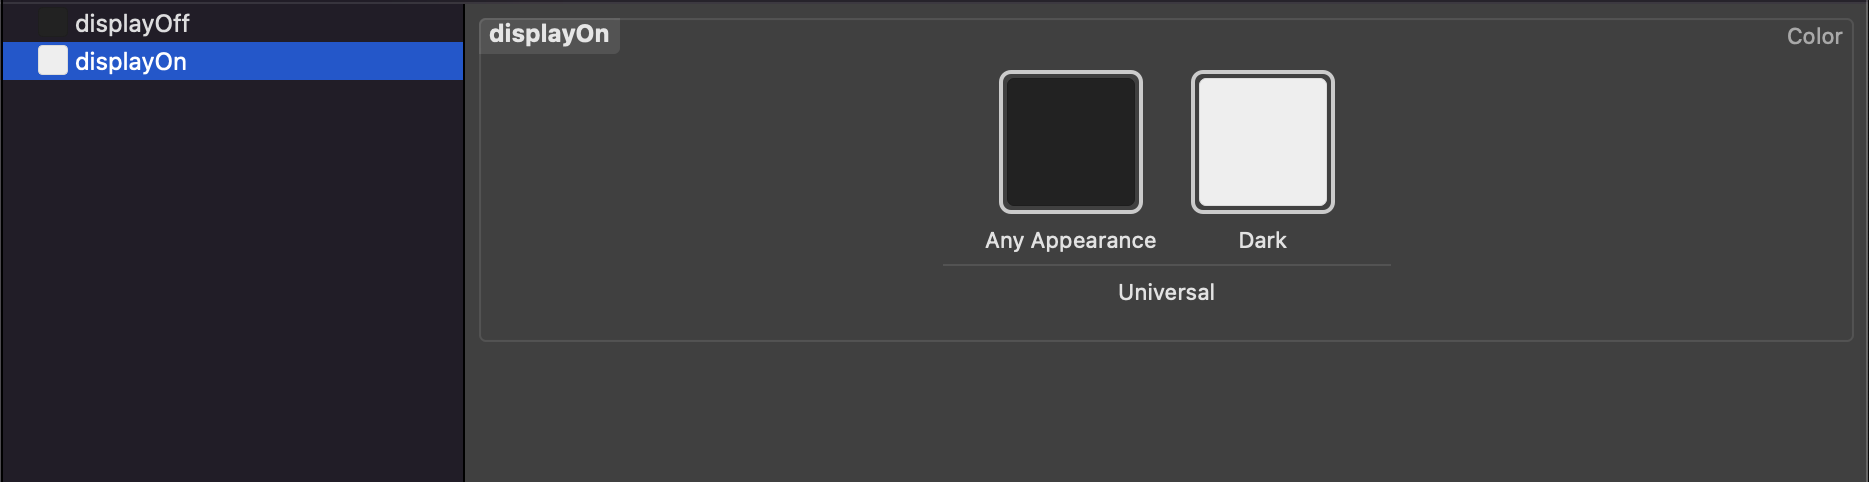
Step 1 - Define the colors.
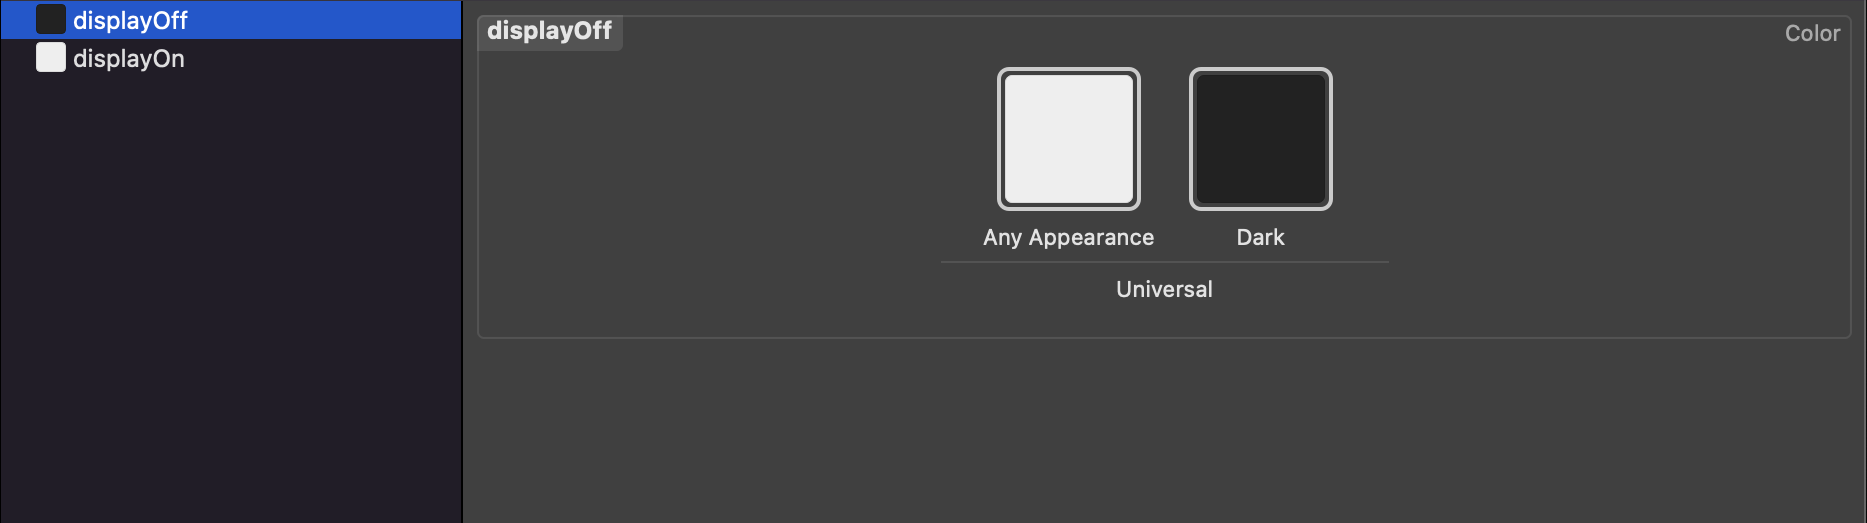
Open the Assets.xcassets file — create two new color sets.
- Color Set 1:
displayOff- Any Appearance
- Hex:
#EDEDED
- Hex:
- Dark
- Hex:
#212121
- Hex:
- Any Appearance
- Color Set 2:
displayOn- Any Appearance
- Hex:
#212121
- Hex:
- Dark
- Hex:
#EDEDED
- Hex:
- Any Appearance
Your results should look like this.
Step 2 - Create the reusable segment.
Create a new file titled: Segment.swift.
This file will contain a Segment class that subclasses UIView. When subclassing UIView, we need to override the initializer functions.
class Segment: UIView {
    override init(frame: CGRect) {
        super.init(frame: frame)
    }

    required init?(coder aDecorder: NSCoder) {
        fatalError("init(coder:) has not been implemented")
    }
}
Now, let's configure the Segment. This view is relatively simple, as the segment is a reusable view that represents each of the seven segments of the display.
In the initializer function, we will define our default background color, round the corners, and prepare the object for auto layout.
backgroundColor = UIColor(named: "displayOff")
roundCorners(.all, radius: 8)
translatesAutoresizingMaskIntoConstraints = false
Excellent! Now, you will have noticed that we used a function (roundCorners) that does not currently exist. Let's fix that.
Step 3 - Create the roundCorners helper.
Create a new file titled: Extension+UIView.swift.
For this step, I am going to skip the explanation since this is boilerplate code that I reuse in all of my projects (and I'm pretty sure that I lifted this from Stack Overflow). If you are interested in learning more about this code, let me know.
import UIKit

extension UIView {

    /// Corner options used for rounding.
    public enum Corners {
        case all
        case top
        case bottom
        case topLeft
        case topRight
        case bottomLeft
        case bottomRight
        case allButTopLeft
        case allButTopRight
        case allButBottomLeft
        case allButBottomRight
        case left
        case right
        case topLeftBottomRight
        case topRightBottomLeft
    }

    /// Adds round corners to a specified location.
    /// - Parameters:
    ///   - corners: The corners of the view that will have the given radius applied to.
    ///   - radius: The radius of the rounded corners.
    public func roundCorners(_ corners: Corners, radius: CGFloat) {
        var cornerMasks = [CACornerMask]()

        // Top left corner.
        switch corners {
        case .all, .top, .topLeft, .allButTopRight, .allButBottomLeft, .allButBottomRight, .topLeftBottomRight:
            cornerMasks.append(CACornerMask(rawValue: UIRectCorner.topLeft.rawValue))
        default:
            break
        }

        // Top right corner.
        switch corners {
        case .all, .top, .topRight, .allButTopLeft, .allButBottomLeft, .allButBottomRight, .topRightBottomLeft:
            cornerMasks.append(CACornerMask(rawValue: UIRectCorner.topRight.rawValue))
        default:
            break
        }

        // Bottom left corner.
        switch corners {
        case .all, .bottom, .bottomLeft, .allButTopRight, .allButTopLeft, .allButBottomRight, .topRightBottomLeft:
            cornerMasks.append(CACornerMask(rawValue: UIRectCorner.bottomLeft.rawValue))
        default:
            break
        }

        // Bottom right corner.
        switch corners {
        case .all, .bottom, .bottomRight, .allButTopRight, .allButTopLeft, .allButBottomLeft, .topLeftBottomRight:
            cornerMasks.append(CACornerMask(rawValue: UIRectCorner.bottomRight.rawValue))
        default:
            break
        }

        clipsToBounds = true
        layer.cornerRadius = radius
        layer.maskedCorners = CACornerMask(cornerMasks)
    }

}
Step 4 - Create the seven-segment number.
Okay, now we can get back to the fun. It is time to build the seven-segment number. The display itself can be made up of as many numbers as you would like, but for now, we will build the reusable number.
First thing's first, create a new file titled: SevenSegmentNumber.swift.
Like before, with the Segment class, we will be subclassing UIView and getting started by overriding the initializers.
class SevenSegmentNumber: UIView {
    override init(frame: CGRect) {
        super.init(frame: frame)
    }

    required init?(coder aDecorder: NSCoder) {
        fatalError("init(coder:) has not been implemented")
    }
}
Next, we can use that Segment view that we created earlier to define our seven segments.
private let a: Segment = Segment()
private let b: Segment = Segment()
private let c: Segment = Segment()
private let d: Segment = Segment()
private let e: Segment = Segment()
private let f: Segment = Segment()
private let g: Segment = Segment()
I am following a standard naming convention for the segments — if naming the segments: top, bottom, middle, etcetera makes more sense to you — then more power to you.
Finally, the final step is to define the layout constraints. Each segment gets four unique constraints to set the exact location. All of this code is contained in a single function that should be called in the initializer.
func setupViews() {
    let thickness: CGFloat = 7

    // Top
    addSubview(a)
    NSLayoutConstraint.activate([
        a.topAnchor.constraint(equalTo: topAnchor),
        a.leadingAnchor.constraint(equalTo: leadingAnchor, constant: 6),
        a.trailingAnchor.constraint(equalTo: trailingAnchor, constant: -6),
        a.heightAnchor.constraint(equalToConstant: thickness)
    ])

    // Top Right
    addSubview(b)
    NSLayoutConstraint.activate([
        b.topAnchor.constraint(equalTo: topAnchor, constant: 4),
        b.trailingAnchor.constraint(equalTo: trailingAnchor),
        b.heightAnchor.constraint(equalTo: heightAnchor, multiplier: 1/2, constant: -4),
        b.widthAnchor.constraint(equalToConstant: thickness)
    ])

    // Bottom Right
    addSubview(c)
    NSLayoutConstraint.activate([
        c.bottomAnchor.constraint(equalTo: bottomAnchor, constant: -4),
        c.trailingAnchor.constraint(equalTo: trailingAnchor),
        c.heightAnchor.constraint(equalTo: heightAnchor, multiplier: 1/2, constant: -4),
        c.widthAnchor.constraint(equalToConstant: thickness)
    ])

    // Bottom
    addSubview(d)
    NSLayoutConstraint.activate([
        d.bottomAnchor.constraint(equalTo: bottomAnchor),
        d.leadingAnchor.constraint(equalTo: leadingAnchor, constant: 6),
        d.trailingAnchor.constraint(equalTo: trailingAnchor, constant: -6),
        d.heightAnchor.constraint(equalToConstant: thickness)
    ])

    // Bottom Left
    addSubview(e)
    NSLayoutConstraint.activate([
        e.bottomAnchor.constraint(equalTo: bottomAnchor, constant: -4),
        e.leadingAnchor.constraint(equalTo: leadingAnchor),
        e.heightAnchor.constraint(equalTo: heightAnchor, multiplier: 1/2, constant: -4),
        e.widthAnchor.constraint(equalToConstant: thickness)
    ])

    // Top Left
    addSubview(f)
    NSLayoutConstraint.activate([
        f.topAnchor.constraint(equalTo: topAnchor, constant: 4),
        f.leadingAnchor.constraint(equalTo: leadingAnchor),
        f.heightAnchor.constraint(equalTo: heightAnchor, multiplier: 1/2, constant: -4),
        f.widthAnchor.constraint(equalToConstant: thickness)
    ])

    // Middle
    addSubview(g)
    NSLayoutConstraint.activate([
        g.centerYAnchor.constraint(equalTo: centerYAnchor),
        g.leadingAnchor.constraint(equalTo: leadingAnchor, constant: 6),
        g.trailingAnchor.constraint(equalTo: trailingAnchor, constant: -6),
        g.heightAnchor.constraint(equalToConstant: thickness)
    ])

    translatesAutoresizingMaskIntoConstraints = false
}
Step 5 - Create the seven-segment display.
Now that the individual seven-segment numbers are complete — we can combine them into the full display. For this tutorial, we will be creating a three digit display with a ones, tens, and hundreds position. For your use case, you can modify this class to add more positions.
For the final time, create a new file titled: SevenSegmentDisplay.swift.
Like last time, we will subclass UIView and override the initializers.
class SevenSegmentDisplay: UIView {
    override init(frame: CGRect) {
        super.init(frame: frame)
    }

    required init?(coder aDecorder: NSCoder) {
        fatalError("init(coder:) has not been implemented")
    }
}
With the class prepared, we can add our three number displays and title them accordingly.
private let hundreds: SevenSegmentNumber = SevenSegmentNumber()
private let tens: SevenSegmentNumber = SevenSegmentNumber()
private let ones: SevenSegmentNumber = SevenSegmentNumber()
Then, we can add them to the view and position them using auto layout. I am using the same function (setupViews), and calling it in the initializer.
func setupViews() {
    addSubview(hundreds)
    addSubview(tens)
    addSubview(ones)

    NSLayoutConstraint.activate([
        hundreds.leadingAnchor.constraint(equalTo: leadingAnchor),
        hundreds.topAnchor.constraint(equalTo: topAnchor),
        hundreds.bottomAnchor.constraint(equalTo: bottomAnchor),
        hundreds.widthAnchor.constraint(equalTo: widthAnchor, multiplier: 1/3, constant: -8),
        tens.centerXAnchor.constraint(equalTo: centerXAnchor),
        tens.topAnchor.constraint(equalTo: topAnchor),
        tens.bottomAnchor.constraint(equalTo: bottomAnchor),
        tens.widthAnchor.constraint(equalTo: widthAnchor, multiplier: 1/3, constant: -8),
        ones.trailingAnchor.constraint(equalTo: trailingAnchor),
        ones.topAnchor.constraint(equalTo: topAnchor),
        ones.bottomAnchor.constraint(equalTo: bottomAnchor),
        ones.widthAnchor.constraint(equalTo: widthAnchor, multiplier: 1/3, constant: -8)
    ])
}
All done! You have now configured all of the UI for displaying a three-digit seven-segment display. Next, we will move on to adding the functionality.
How to Use - Implementing into your app.
Really quick, before we move on, at this point you could start implementing the seven-segment display into your app. Here is the code to do that.
First, create an instance of the display.
let ssd: SevenSegmentDisplay = {
    let view = SevenSegmentDisplay()

    view.backgroundColor = .systemBackground
    view.translatesAutoresizingMaskIntoConstraints = false

    return view
}()
Then, add it to your controller and add the constraints.
let displayHeight: CGFloat = 85 * 13/16
let displayWidth: CGFloat = 50 * 13/16 * 3 + 16

view.addSubview(ssd)
NSLayoutConstraint.activate([
    ssd.centerXAnchor.constraint(equalTo: view.centerXAnchor),
    ssd.centerYAnchor.constraint(equalTo: view.centerYAnchor, constant: -50),
    ssd.heightAnchor.constraint(equalToConstant: displayHeight),
    ssd.widthAnchor.constraint(equalToConstant: displayWidth),
])
All done!
Functionality
Finally, we have finished the implementation of the UI — now we can move on to the functionality. If you happened to try the last step of the UI section and added the display to your app, you would have noticed that nothing happens. Let's fix that.
Step 1 - Reset the display.
A critical function for the display is to be able to reset back to an expected state. For us, that state will be all zeros.
In the SevenSegmentDisplay.swift file, let's start by writing the reset function.
private func reset() {
    hundreds.setValue(0)
    tens.setValue(0)
    ones.setValue(0)
}
Once again, we are calling functions that don't exist, yet. Time to fix that.
Step 2 - Showing numbers.
Now that we know how to set a number for a part of the display, we need to setup the code to turn segments on and off.
In the SevenSegmentNumber.swift file, we will get started by writing yet another reset function. This time, we are not reseting to a specific number, we are resetting the number display to off. This will assist, later, when we need to write functions to display our numbers, zero to nine.
private func reset() {
    a.backgroundColor = UIColor(named: "displayOff")
    b.backgroundColor = UIColor(named: "displayOff")
    c.backgroundColor = UIColor(named: "displayOff")
    d.backgroundColor = UIColor(named: "displayOff")
    e.backgroundColor = UIColor(named: "displayOff")
    f.backgroundColor = UIColor(named: "displayOff")
    g.backgroundColor = UIColor(named: "displayOff")
}
Since we have an easy way to reset the state of the display, now we can setup the functions that will turn the display on. To keep this functionality as simple as possible, I have written individual functions for each number. I will step through them one by one.
Zero (0)
private func zero() {
    a.backgroundColor = UIColor(named: "displayOn")
    b.backgroundColor = UIColor(named: "displayOn")
    c.backgroundColor = UIColor(named: "displayOn")
    d.backgroundColor = UIColor(named: "displayOn")
    e.backgroundColor = UIColor(named: "displayOn")
    f.backgroundColor = UIColor(named: "displayOn")
}
One (1)
private func one() {
    b.backgroundColor = UIColor(named: "displayOn")
    c.backgroundColor = UIColor(named: "displayOn")
}
Two (2)
private func two() {
    a.backgroundColor = UIColor(named: "displayOn")
    b.backgroundColor = UIColor(named: "displayOn")
    d.backgroundColor = UIColor(named: "displayOn")
    e.backgroundColor = UIColor(named: "displayOn")
    g.backgroundColor = UIColor(named: "displayOn")
}
Three (3)
private func three() {
    a.backgroundColor = UIColor(named: "displayOn")
    b.backgroundColor = UIColor(named: "displayOn")
    c.backgroundColor = UIColor(named: "displayOn")
    d.backgroundColor = UIColor(named: "displayOn")
    g.backgroundColor = UIColor(named: "displayOn")
}
Four (4)
private func four() {
    b.backgroundColor = UIColor(named: "displayOn")
    c.backgroundColor = UIColor(named: "displayOn")
    f.backgroundColor = UIColor(named: "displayOn")
    g.backgroundColor = UIColor(named: "displayOn")
}
Five (5)
private func five() {
    a.backgroundColor = UIColor(named: "displayOn")
    c.backgroundColor = UIColor(named: "displayOn")
    d.backgroundColor = UIColor(named: "displayOn")
    f.backgroundColor = UIColor(named: "displayOn")
    g.backgroundColor = UIColor(named: "displayOn")
}
Six (6)
private func six() {
    a.backgroundColor = UIColor(named: "displayOn")
    c.backgroundColor = UIColor(named: "displayOn")
    d.backgroundColor = UIColor(named: "displayOn")
    e.backgroundColor = UIColor(named: "displayOn")
    f.backgroundColor = UIColor(named: "displayOn")
    g.backgroundColor = UIColor(named: "displayOn")
}
Seven (7)
private func seven() {
    a.backgroundColor = UIColor(named: "displayOn")
    b.backgroundColor = UIColor(named: "displayOn")
    c.backgroundColor = UIColor(named: "displayOn")
}
Eight (8)
private func eight() {
    a.backgroundColor = UIColor(named: "displayOn")
    b.backgroundColor = UIColor(named: "displayOn")
    c.backgroundColor = UIColor(named: "displayOn")
    d.backgroundColor = UIColor(named: "displayOn")
    e.backgroundColor = UIColor(named: "displayOn")
    f.backgroundColor = UIColor(named: "displayOn")
    g.backgroundColor = UIColor(named: "displayOn")
}
Nine (9)
private func nine() {
    a.backgroundColor = UIColor(named: "displayOn")
    b.backgroundColor = UIColor(named: "displayOn")
    c.backgroundColor = UIColor(named: "displayOn")
    d.backgroundColor = UIColor(named: "displayOn")
    f.backgroundColor = UIColor(named: "displayOn")
    g.backgroundColor = UIColor(named: "displayOn")
}
With all of these number functions, we can now write the final function for the single digit display — the set value function. This function takes an integer and then calls the appropriate function for turning on the right segments.
/// Sets the display to the given number.
/// - Parameter value: The number to be shown on the display.
func setValue(_ value: Int) {
    reset()

    switch value {
    case 0: zero()
    case 1: one()
    case 2: two()
    case 3: three()
    case 4: four()
    case 5: five()
    case 6: six()
    case 7: seven()
    case 8: eight()
    case 9: nine()
    default: break
    }
}
Step 3 - Show a three-digit number.
With the last step complete, we are now able to show numbers using the seven-segment displays. The final step in configuring the functionality is to add a display function to take an integer (0-999) and show it on the multi-digit seven-segment display. All of the functions that we have added can now come together to enable this.
/// Sets the display to the given number.
/// - Parameter value: The number to be shown on the display.
func setValue(_ value: Int) {

    if value > 999 || value < 0 {
        return
    }

    let str = "\(value)"
    switch str.count {
    case 1:
        hundreds.setValue(0)
        tens.setValue(0)
        ones.setValue(Int(String(str[str.index(str.startIndex, offsetBy: 0)]))!)
    case 2:
        hundreds.setValue(0)
        tens.setValue(Int(String(str[str.index(str.startIndex, offsetBy: 0)]))!)
        ones.setValue(Int(String(str[str.index(str.startIndex, offsetBy: 1)]))!)
    case 3:
        hundreds.setValue(Int(String(str[str.index(str.startIndex, offsetBy: 0)]))!)
        tens.setValue(Int(String(str[str.index(str.startIndex, offsetBy: 1)]))!)
        ones.setValue(Int(String(str[str.index(str.startIndex, offsetBy: 2)]))!)
    default:
        break
    }

}
The first part of this function is to check whether the value will fit on the display. If it will, then we turn the number into a string, get the length, and set the number in the ones, tens, and hundreds place. If the number does not fill all three places, then the empty spaces are set to zero.
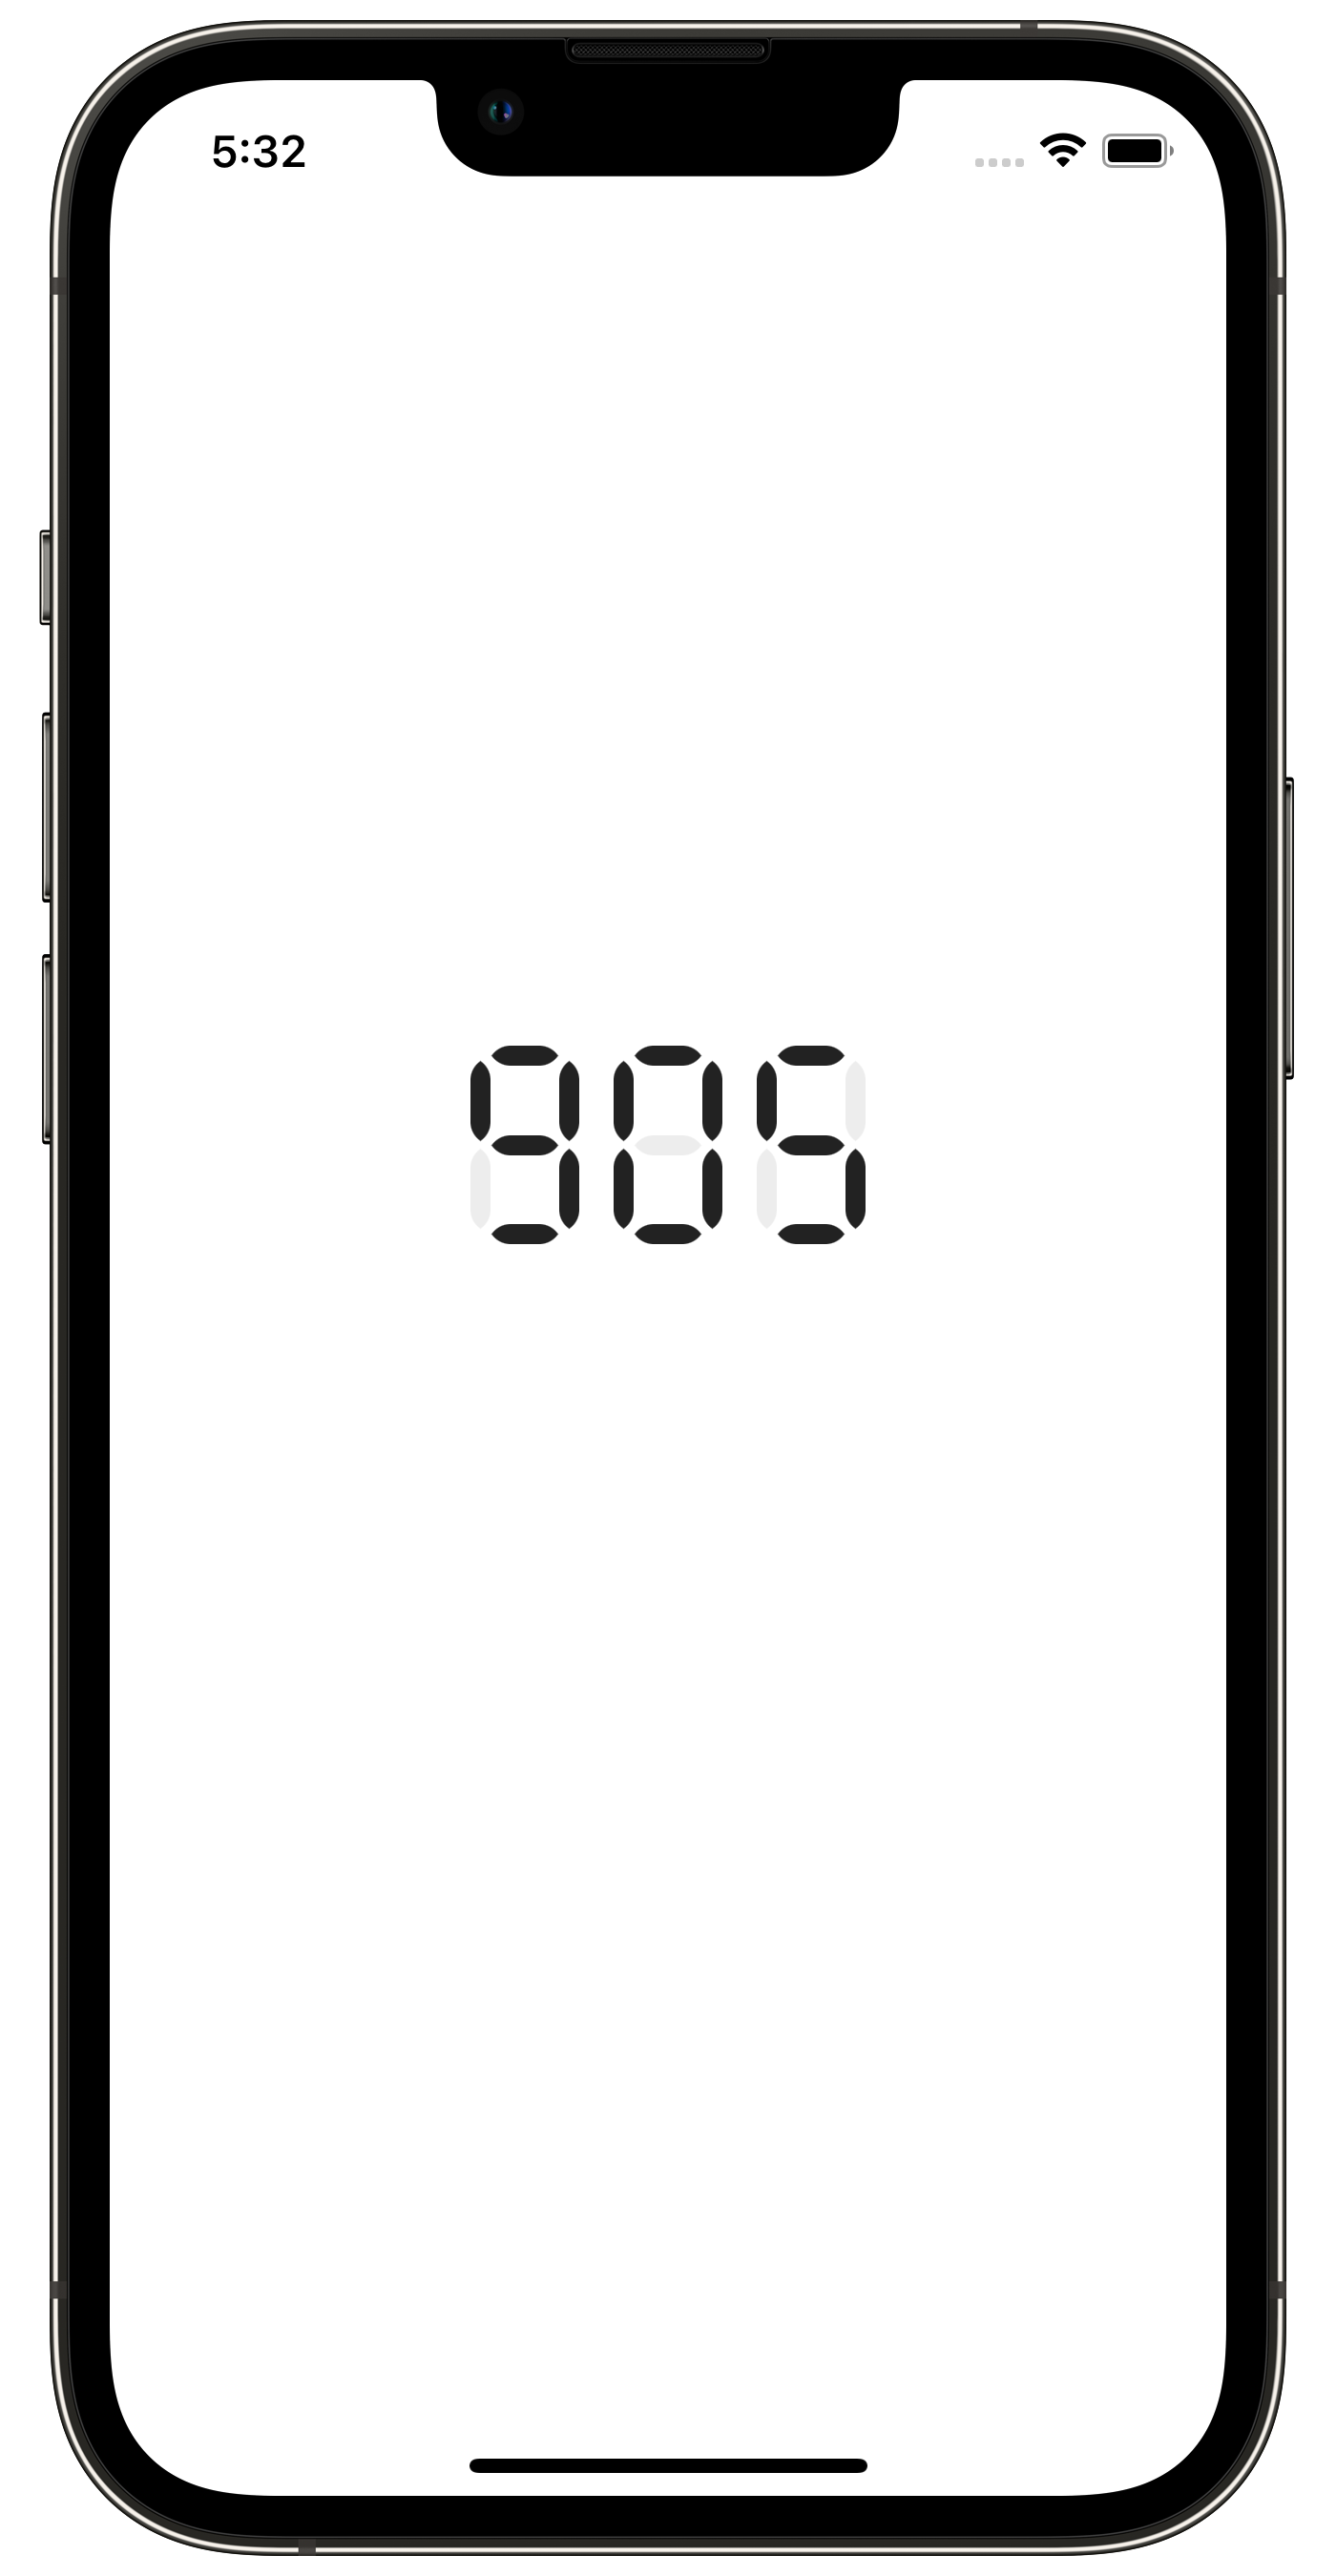
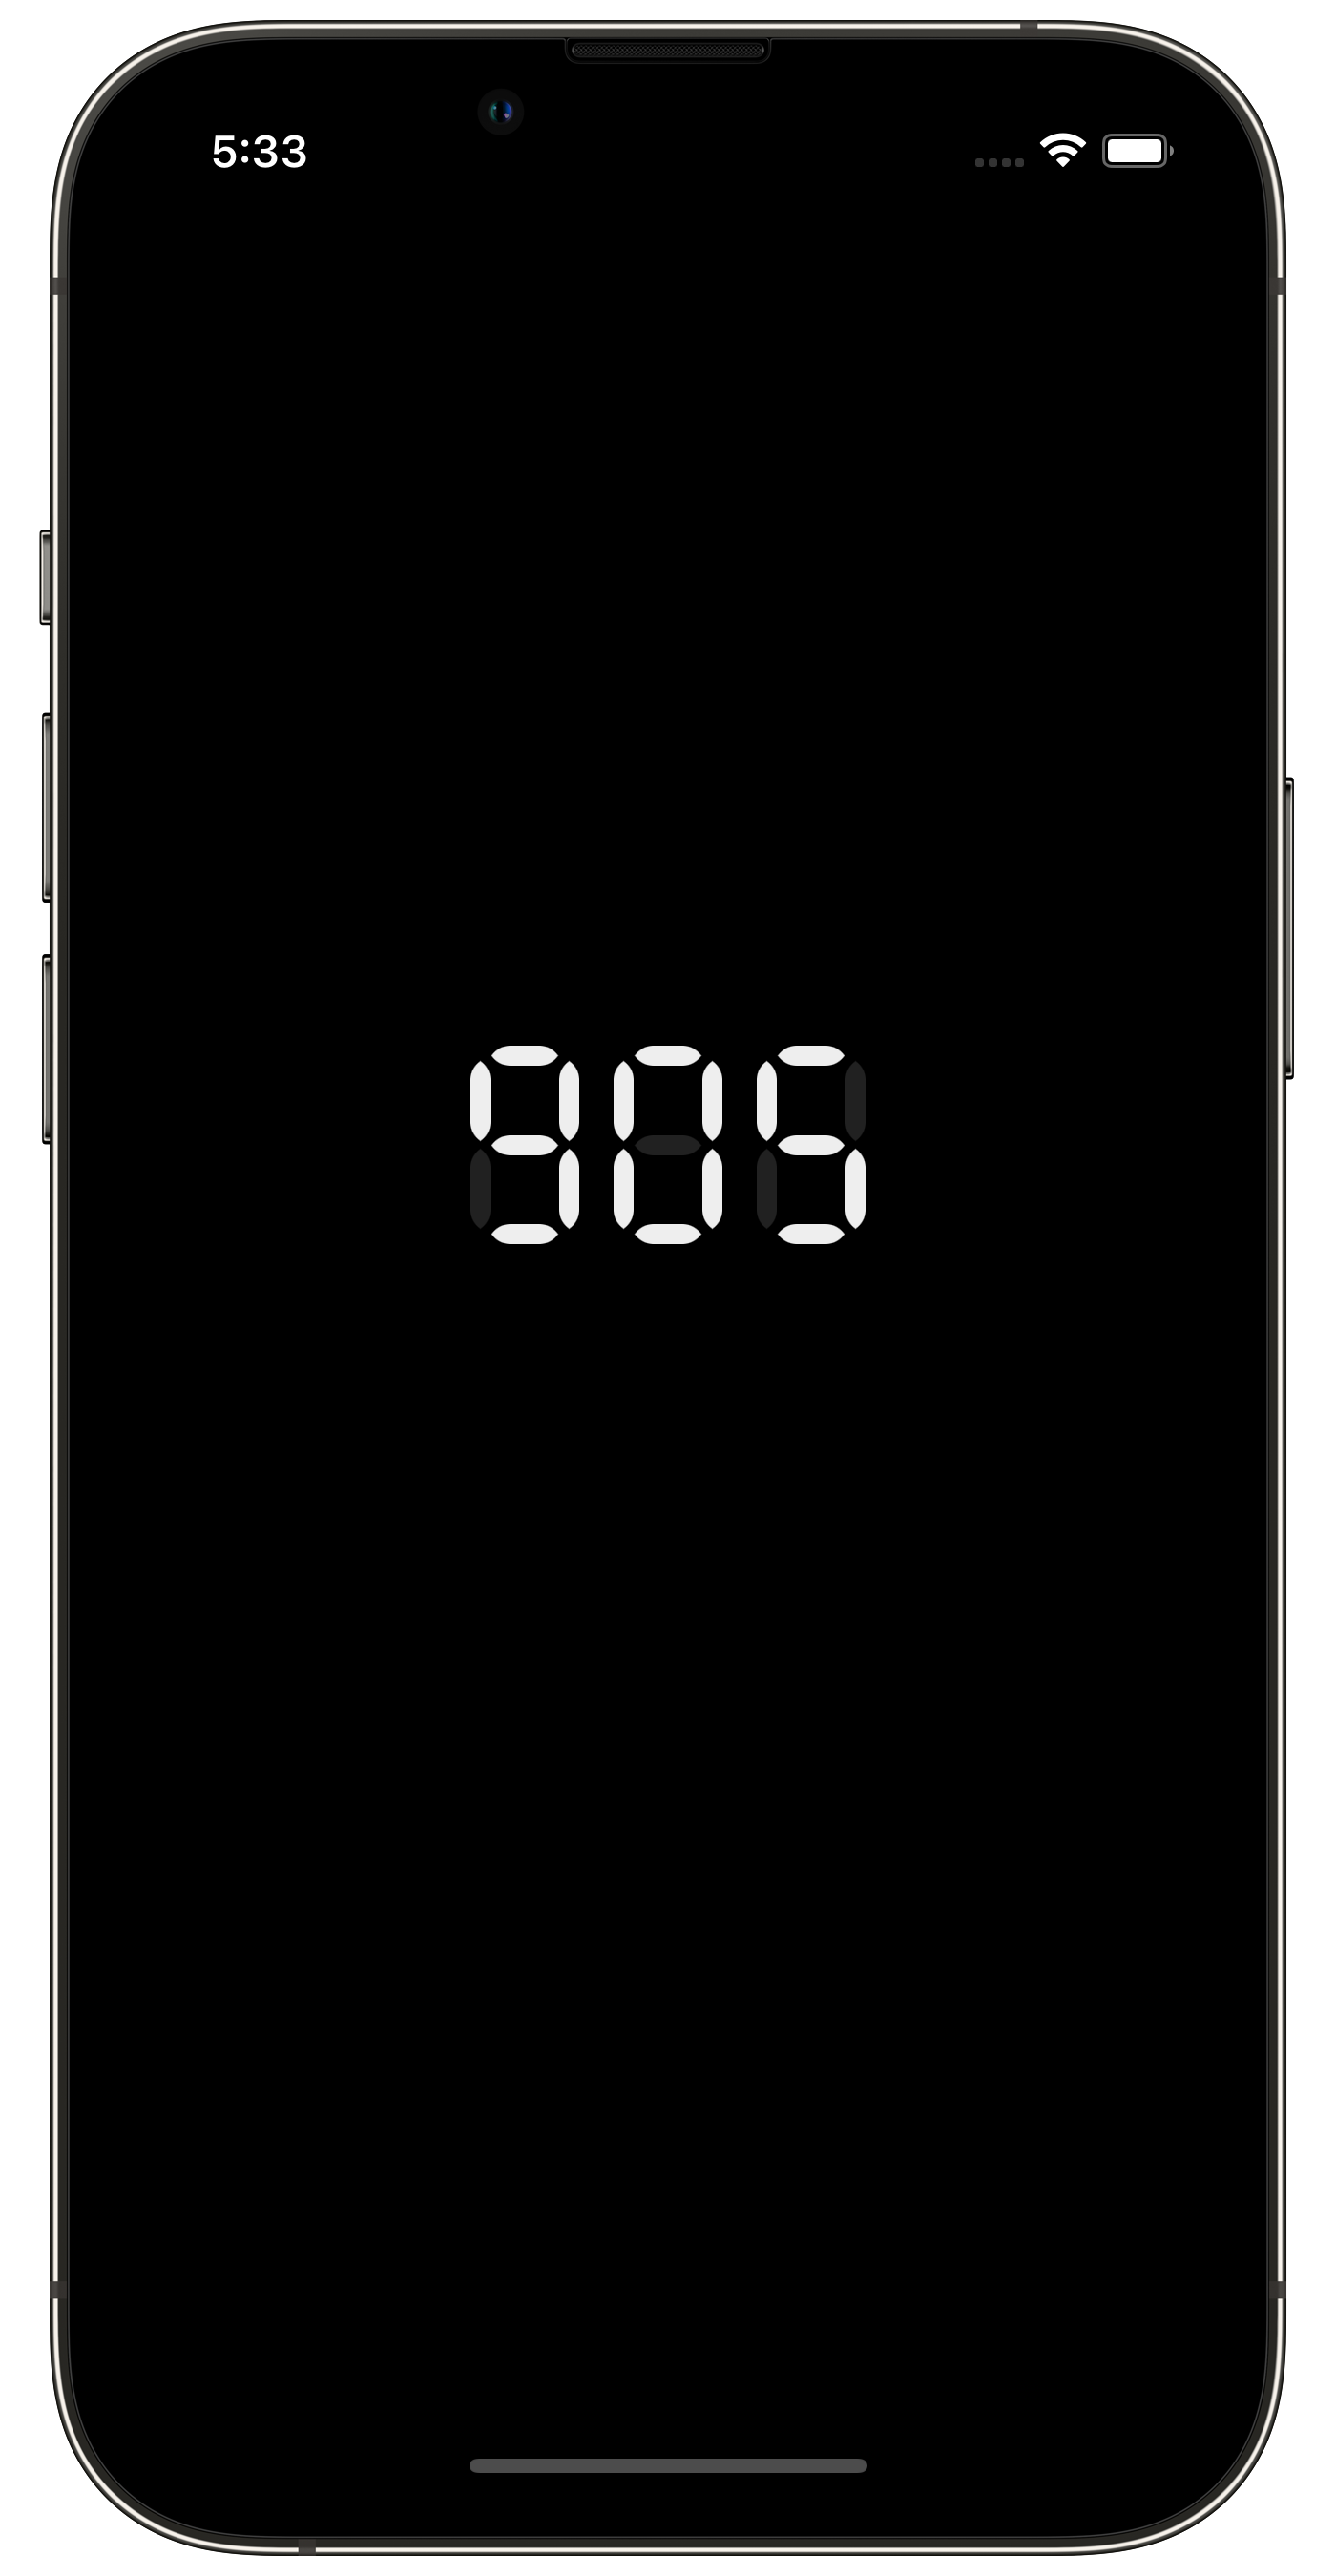
You now have a fully functional seven-segment display to use in your app. To set a value, you need to call the function we just wrote and provide the number you want to set.
For example:
ssd.setValue(905)
This is what you get in your app!
Code
A fully functioning version of this code is available on GitHub.
If you have any questions or recommended changes, feel free to create an issue or submit a pull request.
Footnotes
-
Yes, I know, there is more to this display. A dot to show AM/PM, a dot to show if the alarm is on, and a leading 1 that shows during 2 digit hours. But, we will ignore those for this discussion. ↩
-
While seven-segment displays are able to display most letters, we will be focussing on numbers for this example. ↩
November Challenge – Shave off the Excess
Sunday, 05 November 2017
This post is from a retired blog, hosted here as an archive. The original post date and content has been retained.

For the month of November, we are going with a new challenge to encourage everyone to try to cut down on any excess spending in their lives. For example: eating less fast food, avoiding going out to the movies, or maybe even removing some unneeded subscriptions.
At the end of the month, we will submit a follow up, to this article, showing our success – or failure. If you want to share your progress, throughout or at the end of the month, check out our subreddit – there will be room for you to discuss, over there!
How to be Successful
Our plan to achieve this goal is the following. First, we will review our budget to see what categories we can trim down. Things like entertainment and restaurants are a really good place to start. Eating at home is much cheaper and a lot of times, healthier. Second, we are going to be very conscious of what money we spend, and where. If it is not necessary, we won’t buy it. This does not mean that we will be living a worse life than before, all this means is that we are cutting off the fat that isn’t needed. Finally, the last part is that we will be looking to improve our lives by finding other ways to entertain ourselves, ways that make us better today than we were yesterday.
Good luck! See you at the end of the month!